kelinci 简介 kelinci是一个能够在不修改AFL代码的情况下对Java进行模糊测试的工具。
架构&&原理
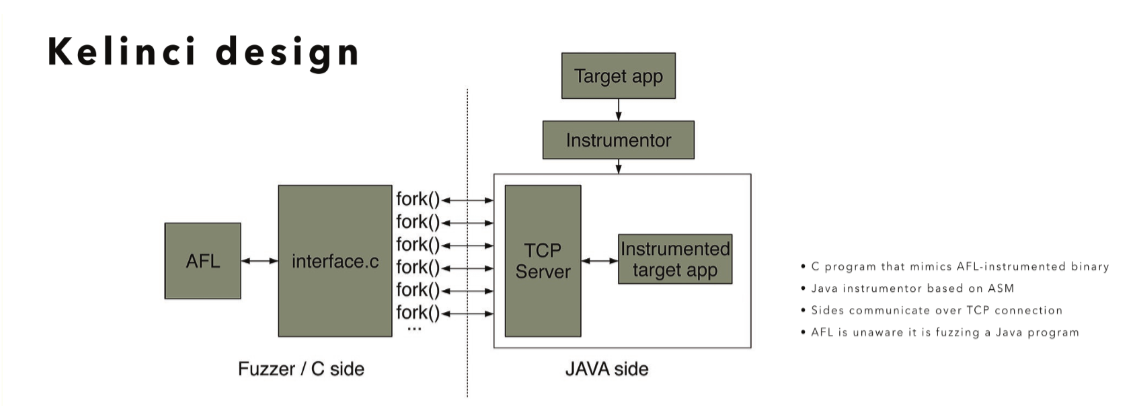
kelinic主要分为两个大模块,分别为Fuzzer端和 Java端。
Fuzzer端 Fuzzer端主要由AFL和一个C文件interface.c组成。
对于AFL来说,AFL只是以为在fuzz interface这个程序,而不是java程序。
AFL在运行过程中会将输入文件传递给interface,然后interface会将文件传递给java端,java端会将运行结果反馈给fuzz端,从而使AFL进一步fuzz。
Java端 Java端的Instrumentor主要有两部分,一个TCP服务器,和真正的要测试的程序。
待测试程序会先使用Java的ASM库进行插桩。
TCP服务器负责和Fuzzer端的interface通信。并运行被插桩的目标程序。
细节 Mem.java kelinci受制于语言,没有像AFL一样直接开辟共享内存区域,而是自己定义了一个Mem静态工具类来当共享内存。
1
2
3
4
5
6
7
8
9
10
11
12
13
14
15
16
17
18
19
20
21
22
23
24
25
public class Mem {public static final int SIZE = 65536 ;public static byte mem[] = new byte [SIZE];public static int prev_location = 0 ;public static void clear () {for (int i = 0 ; i < SIZE; i++)0 ;public static void print () {for (int i = 0 ; i < SIZE; i++) {if (mem[i] != 0 ) {" -> " + mem[i]);
Kelinci.java kelinci类中的main函数首先会解析命令行参数,然后加载目标程序的main函数,
1
2
3
4
5
6
7
8
9
10
11
12
13
14
ClassLoader classloader = Thread.currentThread().getContextClassLoader();try {"main" , String[].class);catch (ClassNotFoundException e) {"Main class not found: " + mainClass);return ;catch (NoSuchMethodException e) {"No main method found in class: " + mainClass);return ;catch (SecurityException e) {"Main method in class not accessible: " + mainClass);return ;
然后会拉起一个服务端线程和fuzz线程
1
2
3
4
5
6
7
8
9
10
11
12
13
14
15
16
Thread server = new Thread (new Runnable () {@Override public void run () {Thread fuzzerRuns = new Thread (new Runnable () {@Override public void run () {
服务器线程会先创建一个socket对象,并监听端口的请求。监听到请求后会将请求放入队列中,供fuzz线程使用,若队列已满则返回队列已满的信号。
1
2
3
4
5
6
7
8
9
10
11
12
13
14
15
16
17
18
19
20
21
22
23
24
25
try (ServerSocket ss = new ServerSocket (port)) {while (true ) {Socket s = ss.accept();boolean status = false ;if (requestQueue.size() < maxQueue) {new FuzzRequest (s));if (!status) {OutputStream os = s.getOutputStream();catch (BindException be) {"Unable to bind to port " + port);1 );catch (Exception e) {"Exception in request server" );1 );
fuzz线程会不断的从请求队列中拉取请求,拉取新的请求后会定义输入输出流,然后将共享内存清0
1
2
3
4
5
6
7
8
9
10
while (true ) {try {FuzzRequest request = requestQueue.poll();if (request != null ) {InputStream is = request.clientSocket.getInputStream();OutputStream os = request.clientSocket.getOutputStream();byte result = STATUS_CRASH;ApplicationCall appCall = null ;
以本地模式来举例,首先读取path的长度,然后读取path,根据path定义appCall,期间异常全部按照连接异常来返回。
1
2
3
4
5
6
7
8
9
10
11
12
13
14
15
16
17
18
19
20
21
22
23
24
25
if (mode == LOCAL_MODE) { int pathlen = is.read() | is.read() << 8 | is.read() << 16 | is.read() << 24 ;if (pathlen < 0 ) {else {byte input[] = new byte [pathlen];int read = 0 ;while (read < pathlen) { if (is.available() > 0 ) {byte ) is.read();else {break ;String path = new String (input);new ApplicationCall (path);
处理好输入文件后,执行appCall,并根据执行的状态返回不同的结果,将status和共享内存通过TCP连接,写回Fuzzer端。
1
2
3
4
5
6
7
8
9
10
11
12
13
14
15
16
17
18
19
20
21
22
23
24
25
26
27
28
29
if (result != STATUS_COMM_ERROR && appCall != null ) {ExecutorService executor = Executors.newSingleThreadExecutor();try {catch (TimeoutException te) {true );catch (Throwable e) {true );if (e.getCause() instanceof RuntimeException) {else if (e.getCause() instanceof Error) {0 , Mem.mem.length);true , 100000 );
appCall中,会调用runApplication函数。
1
2
3
4
5
6
7
8
9
10
11
12
13
14
15
16
17
18
19
private static class ApplicationCall implements Callable <Long> {byte input[];byte input[]) {this .input = input;this .path = path;@Override public Long call () throws Exception {if (path != null )return runApplication(path);return runApplication(input);
runApplicatio函数会执行目标程序。
1
2
3
4
5
6
7
8
9
10
11
12
13
14
15
16
17
18
19
private static long runApplication (String filename) {long runtime = -1L ;for (int i = 0 ; i < args.length; i++) {if (args[i].equals("@@" )) {long pre = System.nanoTime();try {null , (Object) args);catch (IllegalAccessException | IllegalArgumentException | InvocationTargetException e) {throw new RuntimeException ("Error invoking target main method" );return runtime;
插桩的实现主要在MethodTransformer.java里面,InstrumentLocation里面,仿照AFL的方式进行插桩。
1
2
3
4
5
6
7
8
9
10
11
12
13
14
15
private void instrumentLocation () {Integer id = getNewLocationId();"edu/cmu/sv/kelinci/Mem" , "mem" , "[B" );"edu/cmu/sv/kelinci/Mem" , "prev_location" , "I" );1 ));"edu/cmu/sv/kelinci/Mem" , "prev_location" , "I" );
访问类方法,分支时,均会调用插桩函数。
1
2
3
4
5
6
7
8
9
10
11
12
13
14
15
16
17
18
19
20
21
22
23
24
25
26
27
28
29
30
@Override public void visitCode () {@Override public void visitJumpInsn (int opcode, Label label) {@Override public void visitLabel (Label label) {
Instrumentor.java 在Instrumentor.java中,创建ClassTransformer对象,对输入的class进行插桩。
1
2
3
4
5
6
7
8
9
10
11
12
13
14
for (String cls : inputClasses) {"Instrumenting class: " + cls);InputStream bytecode = classloader.getResourceAsStream(cls);ClassWriter cw = new ClassWriter (ClassWriter.COMPUTE_FRAMES);ClassTransformer ct = new ClassTransformer (cw);try {new ClassReader (bytecode);catch (IOException | NullPointerException e) {"Error loading class: " + cls);return ;
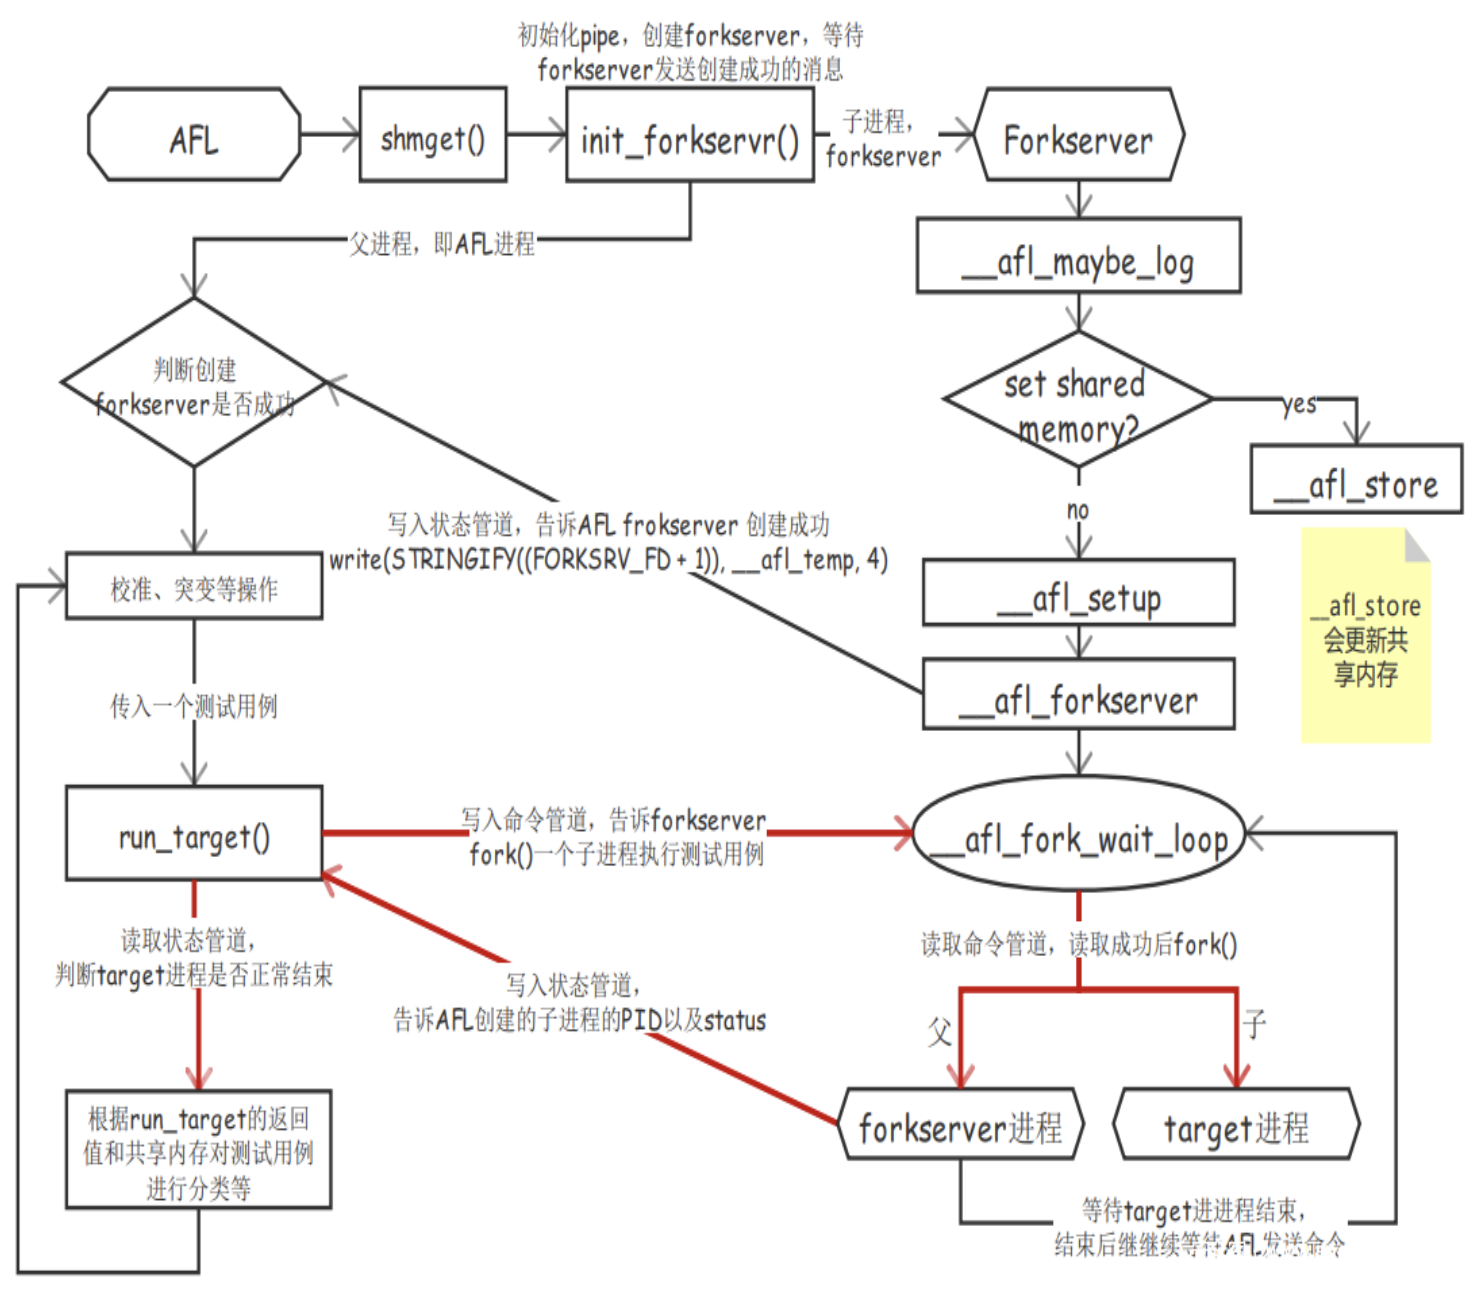
interface.c interface中
首先会创建属于AFL的共享内存
1
2
3
4
5
6
7
8
9
10
11
12
13
14
15
16
17
char * shmname = getenv(SHM_ENV_VAR);int status = 0 ;uint8_t kelinci_status = STATUS_SUCCESS;if (shmname) {1 ;"SHM_ID: %s\n" , shmname);key_t key = atoi(shmname);if ((trace_bits = shmat(key, 0 , 0 )) == (uint8_t *) -1 ) {"Failed to access shared memory 2\n" );"Pointer: %p\n" , trace_bits);"Shared memory attached. Value at loc 3 = %d\n" , trace_bits[3 ]);
然后会开始fork server
1
2
3
4
5
6
7
8
9
10
11
12
13
14
15
16
17
18
19
20
21
22
23
24
25
while (1 ) {if (read(198 , &status, 4 ) != 4 ) {"Read failed\n" );int child_pid = fork();if (child_pid < 0 ) {"Fork failed\n" );else if (child_pid == 0 ) {"Child process, continue after pork server loop\n" );break ;"Child PID: %d\n" , child_pid);199 , &child_pid, 4 );"Status %d \n" , status);if (waitpid(child_pid, &status, 0 ) <= 0 ) {"Fork crash" );"Status %d \n" , status);199 , &status, 4 );
子进程会不断尝试连接java端端服务器,将文件长度和文件的路径发送到服务器。发送后会等待java端返回的状态和共享内存。并将传递过来的共享内存写入真正的共享内存之中。
1
2
3
4
5
6
7
8
9
10
11
12
13
14
15
16
17
18
19
20
21
22
23
24
25
26
27
28
29
30
31
32
33
34
35
36
37
38
39
40
41
42
43
44
45
46
47
48
49
50
51
52
53
do {if (try > 0 )100000 );1 );if (mode == LOCAL_MODE) {char path[10000 ];int pathlen = strlen (path);if (write(tcp_socket, &pathlen, 4 ) != 4 ) {"Error sending path length" );"Sent path length: %d\n" , pathlen);if (write(tcp_socket, path, pathlen) != pathlen) {"Error sending path" );"Sent path: %s\n" , path);1 );if (nread != 1 ) {"Failure reading exit status over socket.\n" );goto cont;"Return kelinci_status = %d\n" , status);uint8_t *shared_mem = malloc (SHM_SIZE);for (int offset = 0 ; offset < SHM_SIZE; offset += SOCKET_READ_CHUNK) {if (nread != SOCKET_READ_CHUNK) {"Error reading from socket\n" );for (int i = 0 ; i < SHM_SIZE; i++) {if (shared_mem[i] != 0 ) {"%d -> %d\n" , i, shared_mem[i]);
3.21补充 实际上手发现了不一样的地方,一般进行AFL模糊测试时,会用afl-gcc对目标程序进行编译插桩,而kelinci并没有。
而是用afl-fuzz直接运行,因为在interface.c中,作者利用了afl本身的管道通信和forkserver的机制。
具体的细节如下面两张图所示
而在interface.c中,作者没有对interface进行插桩,但根据代码可以理解为作者手动进行了插桩,利用了AFL的forkserver机制。
首先开启forkserver机制,通过向FORKSRV_FD+1即199这个文件描述符,向状态管道中写入4个字节的值,用来告知afl fuzz,fork server成功启动,等待下一步指示。
1 2 3 4 5 LOG("Starting fork server...\n" );if (write(199 , &status, 4 ) != 4 ) {"Write failed\n" );goto resume;
进入__afl_fork_wait_loop循环,从FORKSRV即198中读取字节到_afl_temp,直到读取到4个字节,这代表afl fuzz命令我们新建进程执行一次测试。
1
2
3
if (read(198 , &status, 4 ) != 4 ) {"Read failed\n" );
fork出子进程,原来的父进程充当fork server来和fuzz进行通信,而子进程则继续执行target。父进程即fork server将子进程的pid写入到状态管道,告知fuzz。
1 2 LOGIFVERBOSE("Child PID: %d\n" , child_pid);199 , &child_pid, 4 );
然后父进程即fork server等待子进程结束,并保存其执行结果到_afl_temp中,然后将子进程的执行结果,从_afl_temp写入到状态管道,告知fuzz。
1
2
3
4
5
6
if (waitpid(child_pid, &status, 0 ) <= 0 ) {"Fork crash" );"Status %d \n" , status);199 , &status, 4 );
父进程不断轮询__afl_fork_wait_loop循环,不断从控制管道读取,直到fuzz端命令fork server进行新一轮测试。
运行 作者在项目里给了运行实例。
首先要编译目标程序
然后对目标程序进行插桩,这里由于java反射安全等原因,只能用jdk8,才能成功运行并进行插桩。
1 java -cp ../../instrumentor/build/libs/kelinci.jar edu.cmu.sv.kelinci.instrumentor.Instrumentor -i bin -o bin-instrumented
然后可以开始启动kelinci的server端
1 java -cp bin-instrumented edu.cmu.sv.kelinci.Kelinci SimpleBuggy @@
再启动AFL端即可对目标java程序进行fuzz
1 afl-fuzz -i in_dir -o out_dir ../../fuzzerside/interface @@